How-To Guides
On this page you find short instructional guides to project tasks and experimental work.
Measurements and Experiments
What is the proper jumper setting for MSP-EXP432P401R and AUDIO-BOOSTXL?
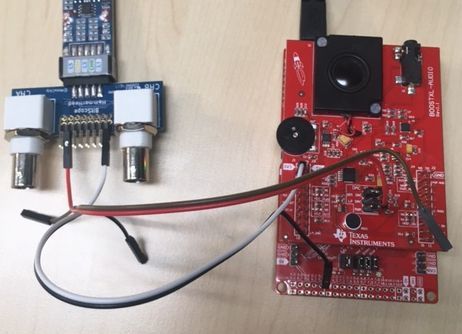
Use the following photo to check if all your jumper settings are properly configured for labs and lecture examples.
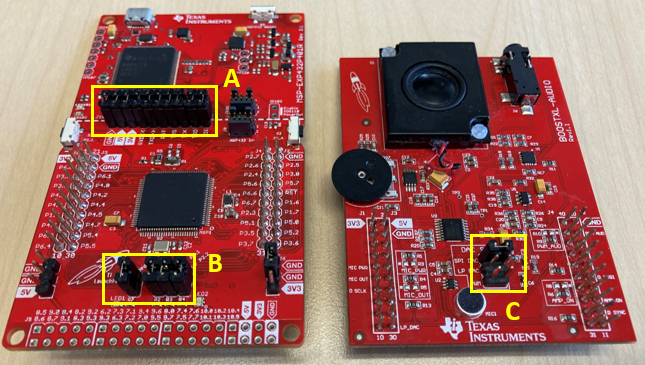
Jumper block A: Make sure that a set of 10 jumpers connects the MSP432 chip to the JTAG programming module.
Jumper block B: Make sure that a set of 4 jumpers connects the MSP432 chip GPIO ports to the LED1 and LED2.
Jumper block C: Make sure that a single jumper in the upper position connects the DAC output to the audio amplifier.
How do I find the COM port used by Bitscope?
For the Bitscope to function properly, you have to configure the proper COM port in the Bitscope setup. Here is how you can identify the proper COM port.
On Windows, open the device manager (by running ‘Device Manager’ from the search prompt). Look for the entry Ports (COM & LPT). If the MSP-EXP432P401R kit and the bitscope are both connected, you will find three COM ports are in use.
In the Bitscope setup, you would now use COMz as the proper configuration, where z is an integer. Examples are COM16, COM17, etc.
Device Manager Entry |
Purpose |
|---|---|
XDS110 Class Application/User UART (COMx) |
User UART for the MSP432P401R |
XDS110 Class Auxiliary Data Port (COMy) |
Programming/debug port for MSP432P401R |
USB Serial Port (COMz) |
Bitscope data port |
How do I use the recording feature in BitScope BS05?
Right-click on the recorder function of bitscope and select ‘New’. This will open a dialog that allows you to create a CSV file.
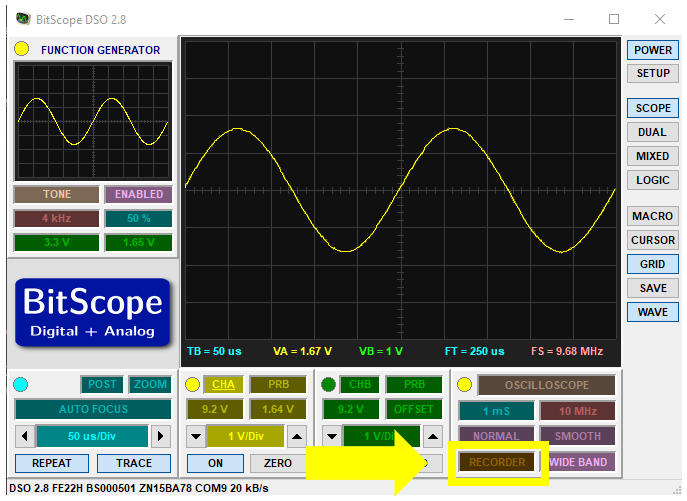
Once the recorder function is opened, the button changes to ‘Ready’. To start recording, right-click again and select ‘Record’. The button now changes into ‘Recording’. Bitscope will now start saving traces into the CSV file. Every trigger, the Bitscope software will write one trace into the file. This continuous until you end the recording. To end the recording, right-click the record button again and select ‘Close’.
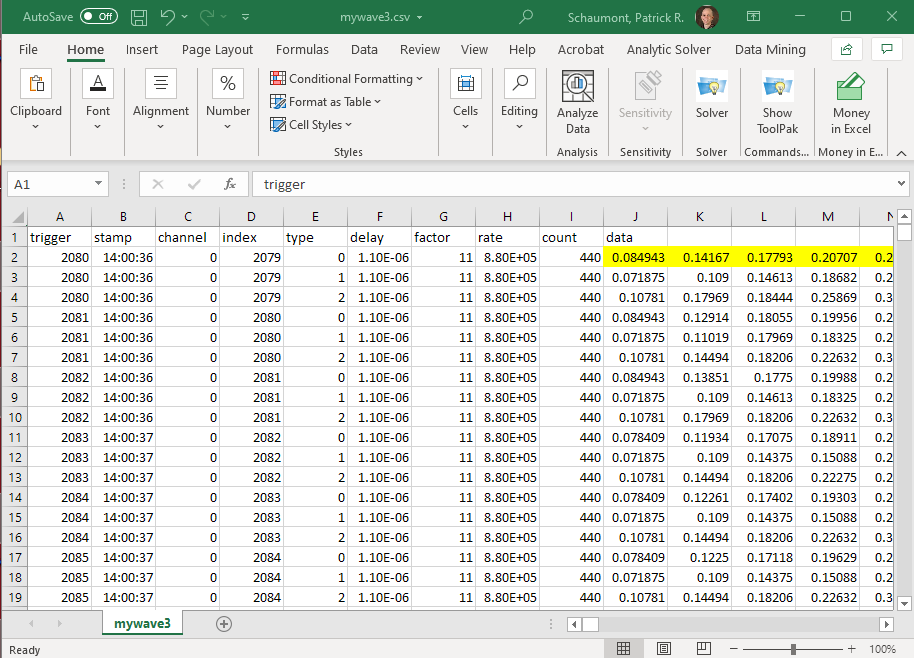
The resulting file can be opened in Excel. The traces are arranged by row, and the data samples start with the column labeled ‘data’. You can copy that data and postprocess it into matlab as follows.
% read the data values starting at row 2, column 10
M = csvread('bitscopevalues.csv', 2, 10);

% plot trace #3 (third row of data)
plot(M(3,:))
How do I minimize the noise in the measured bitscope signal?
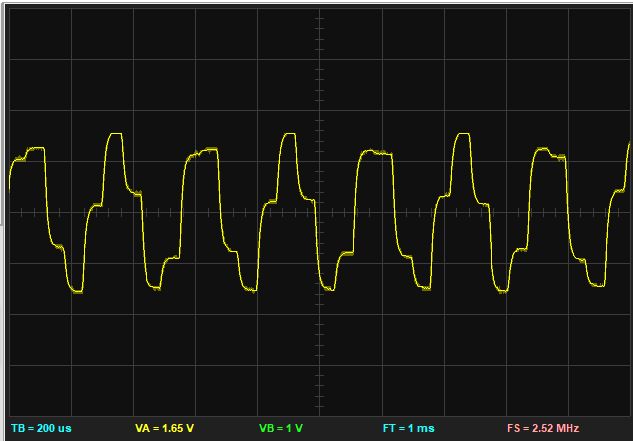
Even though we are measuring signals with a relatively small bandwidth, it’s still possible to pick up a lot of noise, such as shown in the following trace.
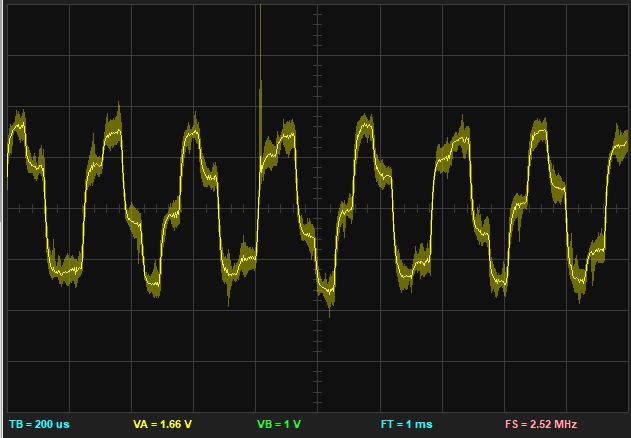
This noisy image was recorded at 200mV/div, indicating there is significant disturbance. In this case, the noise was caused by improper grounding of the measurement setup. As shown in the setup, both the waveform generation signal, and the measured DAC output are measured using a single wire without ground. The net effect is a ‘ground loop’, where the common ground between MSP-432 kit and the bitscope runs through the USB cables.
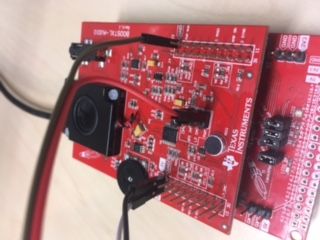
With proper grounding, we obtain a clean signal. While grounding cannot eliminate all sources of interference, it will be a major contribution to measuring sharp traces in your DSP experiments.
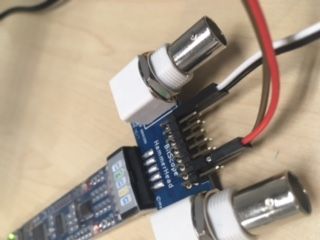
Provide a ground signal for every live signal. You can use wire pairs and connect the ground signal on the MSP-432 kit side as well as on the bitscope side. The bottom header pins of the Hammerhead extension are all grounded.
Software Development
How do I configure CCS for GitHub access?
The projects and examples in this course are distributed through GitHub. Code Composer Studio has built-in support for git repository access. There are two possible mechanisms to access a remote git repository. The first makes use of the HTTPS protocol, and requires you to type in your GitHub password. The second makes use of the SSH protocol, and requires you to configure a public key for your GitHub account.
We strongly recommend that you configure your GitHub account with a public key. This will help you save lots of precious time that is otherwise spent in typing passwords over and over.
Here are the steps you need to follow to configure a public key in your Github account.
Install openssh on your computer. For Windows, follow the instructions on Microsoft’s website. Complete the steps for an openssh client.
Open a powershell (Search - Windows Powershell). Type the command
ssh_keygenwhich will configure a public/private keypair in your account. By default this will bec:/users/username/.ssh/id_rsafor the private key andc:/users/username/.ssh/id_rsa.pubfor the public key. The default settings are OK. During creation of a keypair, the tool will ask you if you’d like to use a passphrase for your keypair. A passphrase is a password that protects your private key. Using a passphrase avoids that your private key is stored in plaintext format on your harddrive (better).Open the public key (
id_rsa.pub) in an editor. This will look something like this. Note that Windows thinks that ‘.pub’ files are files for Microsoft Publisher. Make sure to openid_rsa.pubwith an editor, not with Microsoft Publisher.
ssh-rsa AAAAB3NzaC1yc2EAAAABJQAAAYEA61OxYHJH/uDY8ZmxS/1H4hy4bk981+6ofbEbQQySSGYxhYGvfoVjasX6opVyOOm+uN2XnfCqetcjzEI7fddBhDe2tZzfTB+tvcL4rSu7cWQuCsG6pTgxdcEs5S1c6P/OWeNJRMCJTBr9FJjB+tsz8YAbasB83pZEkFZkVZmIM7VEyD6LfnijjpFKoaj4+ZjtfDf0Ra6fPirUS2kYCmuUQcbSmtxxDw8bVw667USOwQcbx+IX7SHMdsPT7edUIuiJR3MEZCeeoEZHaCDjEJoPfLT1dslBc8BmGWNt4XzoU1iq7Q32cdAavPCICl/KzN5EmH4LtWYnSiSyuc/mWKzvlUmFeB87fqqGu5a5+vv0c2lE0e5IOs8HoNFIqwghNw8gYu2LkT3yxZ+Bkv4+U4tT+OKdNblqXv4v1VqsWhs9BT4/I6I3tnWXmqaJdu0kwWi10FeqO8+VLNpHEb+CtNo/XCW75z+r2exmKvRZ5iqhO+H2ZsoexHsDAhsJ8pToHItd rsa-key-20210113
Open a webbrowser and access your GitHub account. Select Account - Settings - SSH and GPG Keys. Then select ‘New SSH Key’ and paste your public key into the text field. Give it a descriptive title, like ‘laptop access’.
You are now ready to check out repostories in CCS. When you provide a URL to import a git repository in CCS, make sure to select the SSH link, not the HTTPS link. For example:
- ::
// use this URL for SSH access git@github.com:wpi-ece4703-b21/lab-1-patrickschaumont.git
// don’t use this URL for SSH access https://github.com/wpi-ece4703-b21/lab-1-patrickschaumont.git
What settings do I need to use the XLAUDIO library from scratch in a new CCS project?
We assume that you have already the XLAUDIO library downloaded so that it is visible in the workspace of CCS. Now, you would like to add a project that uses the XLAUDIO library, or you would like to verify that another project in the same workspace can properly use XLAUDIO.
To use XLAUDIO, you have to set a proper include path, a proper linker path, and an environment variable to select the proper processor type.
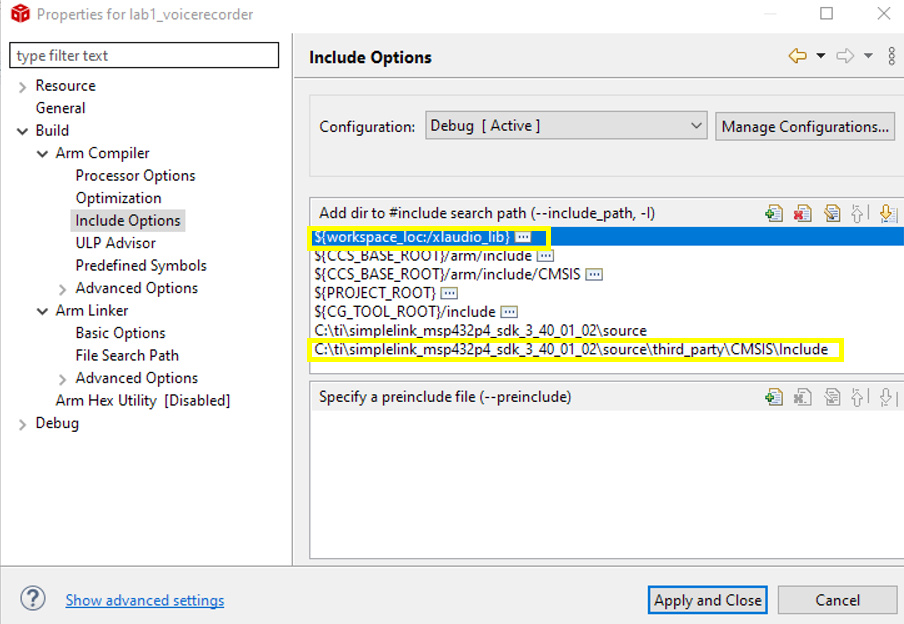
1. To set or verify the proper include path, open the ARM Compiler settings as follows. Right-click on a project and select ‘Properties’. Select ‘Build .. Arm Compiler .. Include Options’. Ensure that the following include search path is set: ${workspace+loc:/xlaudio_lib}. Furthermore, ensure that the compiler can find the CMSIS DSP extensions included as part of the SimpleLink MSP432P4 SDK. This is done by ensuring that the following include search path is set: C:\ti\simplelink_msp432p4_sdk_3_40_01_02\source\third_party\CMSIS\Include. Note that, as of CCS 10.4, the SimpleLink SDK for the MSP432P401R processor is no longer directly supported, so you have
to code and absolute path to the SDK. The resulting setings should look as follows.
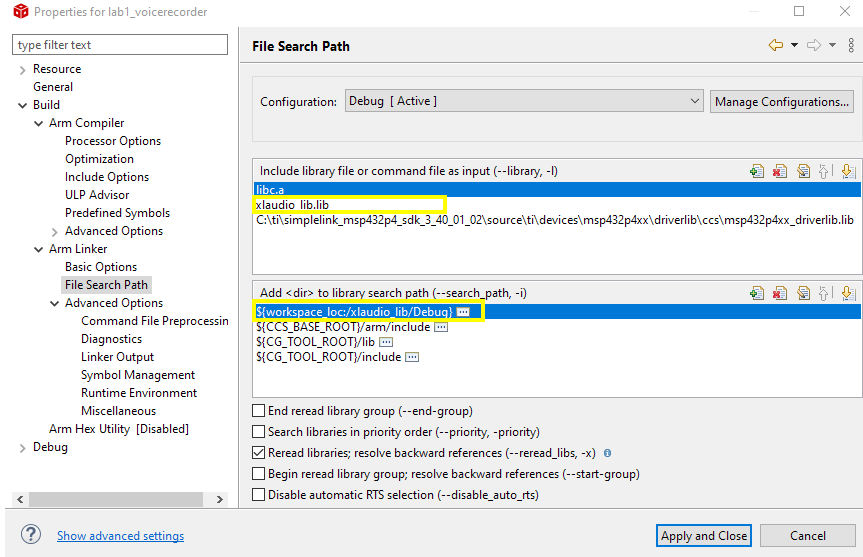
2. To set or verify the proper linker path, open the ARM Linker settings as follows. Right-click on a project and select ‘Properties’. Select ‘Build .. Arm Compiler .. File Search Path’. Ensure that the
following library is included: xlaudio_lib.lib. Ensure that the following search path is included:
${workspace+loc:/xlaudio_lib/Debug}. The resulting setings should look as follows.
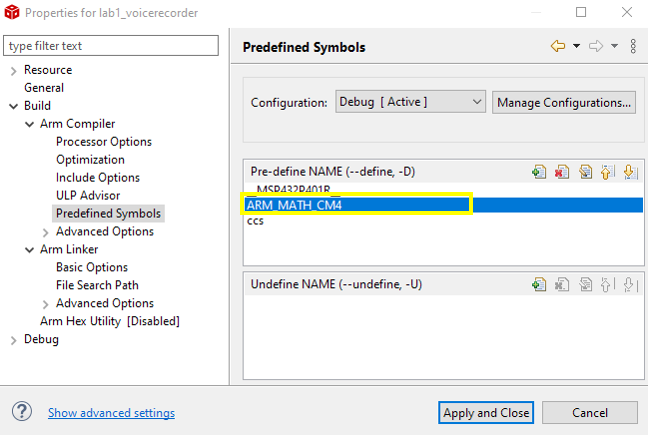
To set or verify the processor environment variable to compile CMSIS with XLAUDIO, define the following variable:
ARM_MATH_CM4. Select ‘Build .. Arm Compiler .. Predefined Symbols’. Ensure that that variable is included. The resulting settings should look as follows.
Where is my source code stored, if I use CCS and/or Github?
Code Composer Studio (CCS) and GitHub work well together, but you have to keep in mind that both of them have their own way of organizing the file system. CCS creates a workspace, a directory on your disk where it can store projects. When Version Control is not used in CCS, the workspace will store all the source code of your project.
Once you use GitHub, your projects move to a repository, and that repository is stored in the git directory of your disk. In general, the workspace and the git directory are stored in different locations on the disk. During regular use of CCS, you will rarely interact with the file system of your PC regarding source code, therefore you can treat workspace and git directory as an organizational issue that happens under the hood. However, if you would ever venture to inspect the physical organization of your projects on your disk, keep in mind that the non-version controlled portions of your projects will be in the CCS workspace, while the version controlled portion of your projects will be in the GitHub directory.
How do we add a project to our local Github repository?
Right-click on the non-repo project and select ‘Team .. share ..’
In the project sharing window, select the repository you want to add it to. Use the pull-down selector to get a list of currently-used repositories
How do we return code to Github from within Code Composer Studio?
Right-click on your project in the project explorer and select ‘Team .. commit ..’. Note: If you don’t see ‘Team .. commit ..’ but only ‘Team .. share ..’, then your project is not included in a repository yet. Consult the previous question (How do we add a project to our local Github repository)
In the ‘Git Staging’ window that appears, make sure that all the files you have changed are in the ‘Staged Changes’ window. Drag them from ‘Unstaged Changes’ to ‘Staged Changes’ if needed.
In the ‘Git Staging’ window, add a comment message
In the ‘Git Staging’ window, click on ‘Commit and Push’. It’s a good idea to open a browser afterwards, go to github.com and verify that your repository has been updated with your code.
Digital Signal Processing Theory
How do I go from z-plan poles and zeroes to G(z) and vice versa?
The filter transfer function  and its z-plane features are related as follows.
Writing as
and its z-plane features are related as follows.
Writing as  , then the zeroes of are the values of z
where
, then the zeroes of are the values of z
where  is zero, and the poles of are the values of z where
  is zero.
From z-plane to G(z)
Here’s an example. Pick a point in the z-plane defined by  . To create a zero, we would
form the expression
. To create a zero, we would
form the expression

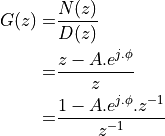
We are used to see G(z) written in terms of  . So, let’s introduce
  and compute
.
and compute
.
In order to make G(z) causal (i.e., only negative powers of z), we are introducing a pole at the
center of the unit circle. G(z) has the following impulse response:  , followed by
  .
.
When G(z) needs to have real coefficients, the zeroes (and poles) have to appear in conjugate pairs.
Let’s for example create an H(z) containing two zeroes, one at and one at
 , then we would create:

To make H(z) causal, we have to introduce a double pole at the center of the unit circle.
From G(z) to z-plane
We use a root finding program, such as the roots function in Matlab.
Here’s an example. If you have the following G(z)

Then we would have the following equation in terms of z:
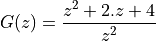
In matlab we would compute roots([1 2 4]) which gives a complex conjugate pair  . This corresponds to two
zeroes located outside of the unit circle.
. This corresponds to two
zeroes located outside of the unit circle.