Lecture 22 - Codesign Challenge 2
Introduction
In this lecture, we will discuss strategies on optimization of the Codesign Challenge. As you may recall from last lecture, the key challenge of this problem is to perform a large amount of floating point matrix multiplications on reference hardware that misses an efficient memory hierarchy and a mechanism for floating point acceleration.
Floating Point Hardware
Optimizing the performance of the floating point computations is a must. This can be done in two different ways.
-
You can quantize the design by substituting the floating point computations with fixed point computations. This will greatly improve performance. The advantage of this transformation is that you can do it almost completely in software. Simply rewrite the C program using
integer(forfix<32,L>, whereLhas to be chosen such that you get sufficient precision (no underflow nor overflow). Furthermore, because the optimization is done exclusively in C, you can do it while compiling your program for X86, avoiding debugging on the board. There are two caveats that you have to take into account. The first is that the Nios II/e is a really slow processor; it does not have a hardware multiplier. Therefore, even integer multiplications will be slow, and you will have to consider hardware acceleration of integer multiplication. The second caveat is that the program is rather complex, and uses floating point in many different locations. In other words, there are floating point operations beyond the matrix multiplication that you intend to optimize. Hence, you will have to carefully verify that you have quantized the design correctly. -
The second method is to introduce floating point hardware. Since we are primarily considering performance, this may be a quick way to achieve acceleration. On the downside, adding floating point hardware will bring the board (and debugging onto the board) in the design cycle.
In the previous lecture, we already described how floating-point custom instructions can be added in the design. By adding a floating point custom instruction, you instantiate a floating point adder/subtractor/multiplier into the design. The board support package generation will create custom-instruction calls in the executable.
The floating point hardware is integrated in three files in the platform design:
fpoint_hw_qsys.v, fpoint_wrapper.v and fpoint_qsys.v.
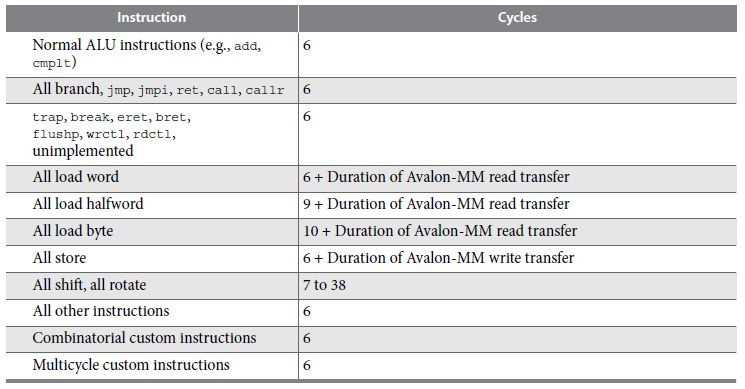
The performance improvement obtained by adding floating point hardware is considerable - about three times. However, it’s clear that the floating point hardware alone is not sufficient. The instruction execution of the Nios II/e is very slow, and custom-instructions on the Nios II/e are still integrated in the same slow processor.
Figure: Nios II/e cycle count performance

Direct Memory Access
A Direct Memory Access (DMA) unit performs memory read/write operations on behalf of the processor. Because the DMA executes directly in hardware, it is not affected by the performance of the processor. DMA is used for memory-to-memory copy operations, for memory-to-peripheral copy operations, and for peripheral-to-memory copy operations. By using a DMA, the overhead of software address calculations, loop counting, pointer arithmetic, etc, can be greatly reduced.
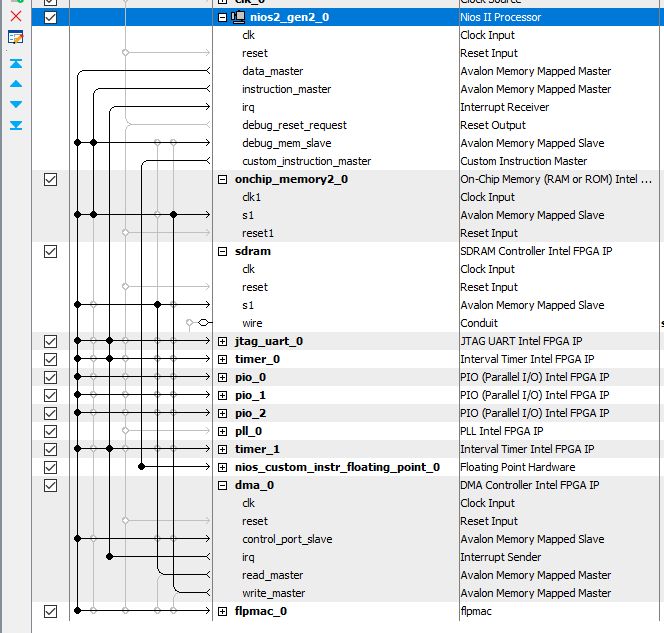
A DMA unit is a device with two master interfaces: a read master interface and a write master interface. In addition, for programming operations, it has a slave port.
Figure: DMA Unit

Each DMA transfer copies a number of bytes (length) from a read region (readaddress)
to a write region (writeaddress). There are many variations in general DMA schemes - for this demonstration we assume a simple word-size transfer from one memory
region to the next. In other words, the DMA unit implements the hardware equivalent of
the following software loop.
int *src = readaddress;
int *dst = writeaddress;
for (i=0; i<(length / 4); i++) {
  dst[i] = src[i];
}
The following diagram shows a DMA peripheral set up to copy data from off-chip SDRAM to on-chip memory.

Of course, to read/write data conviently (i.e., in C) into SDRAM and on-chip memory,
you have to allocate variables appropriately. You can do this by creating
extra compiler sections in your code.
For example, the following two arrays will be created in two different sections.
The first one will be allocated in the SDRAM (the default ‘data’ memory in the
codesign challenge configuration). The second one will be allocated in the section
onchipdata.
unsigned testdata[100];

unsigned int __attribute__((section (".onchipdata"))) targetdata[100];
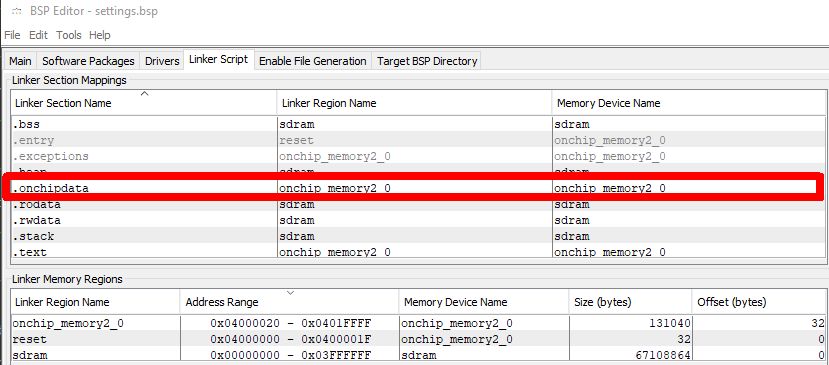
When you create the board support package, you have to allocate
these new extra sections (like onchipdata) into a specific memory. You can
do this using the linker table of the BSP editor.

To program the DMA, you have to program a transmit channel and a receive channel.
The transmit channel performs the read operations from the source memory.
The receive channel performs the write operations to the destination memory.
Each of these channels can be programmed and operated independently. A DMA
transfer is posted, and its completion is indicated with a callback function.
The following program illustrates copying 400 bytes (100 words) from SDRAM
to on-chip memory in groups of 40 bytes. Only the receive channel uses a
completion callback. Both alt_dma_txchan_send and alt_dma_rxchan_prepare
are non-blocking functions that return immediately, before the completion
of the DMA transfer.
#include "system.h"
#include <stdio.h>
#include <string.h>
#include "sys/alt_dma.h"

unsigned testdata[100] = {
7, 2, 1, 0, 4, 1, 4, 9, 5, 9,
0, 6, 9, 0, 1, 5, 9, 7, 3, 4,
9, 6, 6, 5, 4, 0, 7, 4, 0, 1,
3, 1, 3, 4, 7, 2, 7, 1, 2, 1,
1, 7, 4, 2, 3, 5, 1, 2, 4, 4,
6, 3, 5, 5, 6, 0, 4, 1, 9, 5,
7, 8, 9, 3, 7, 4, 6, 4, 3, 0,
7, 0, 2, 9, 1, 7, 3, 2, 9, 7,
7, 6, 2, 7, 8, 4, 7, 3, 6, 1,
3, 6, 9, 3, 1, 4, 1, 7, 6, 9};

unsigned int __attribute__((section (".onchipdata"))) targetdata[100];

volatile int doneflag = 0;
static void dmadone() {
  doneflag = 1;
}

void main() {
  unsigned i;

  printf("Clear target\n");
  memset(targetdata, 0, sizeof(unsigned int) * 100);

  printf("Setup DMA\n");
  alt_dma_txchan txchan;
  alt_dma_rxchan rxchan;
  txchan = alt_dma_txchan_open ("/dev/dma_0");
  if (txchan == NULL)
    printf("Error opening tx channel\n");
  rxchan = alt_dma_rxchan_open ("/dev/dma_0");
  if (rxchan == NULL)
    printf("Error opening rx channel\n");

  for (i=0; i<10; i++) {

    alt_dma_txchan_send( txchan,
                         testdata + i*10,
                         10 * sizeof(unsigned int),
                         NULL,
                         NULL);

    alt_dma_rxchan_prepare( rxchan,
                            targetdata + i*10,
                            10 * sizeof(unsigned int),
                            dmadone,
                            NULL);

    while (!doneflag)
      printf("Wait for DMA\n");

    doneflag = 0;
  }

  for (i=0; i<100; i++)
    printf("Data[%d] = %d\n", i, targetdata[i]);

  while (1);

}
Floating Point Custom Hardware
Finally, let’s see how we can combine the ideas of floating point custom instructions and DMA. Custom instructions cannot be called by a DMA unit, since the DMA unit only performs memory (bus) read/write operations. However, a custom-instruction unit can be triggered indirectly by a bus transfer, by building a dedicated coprocessor.
We will build a coprocessor, FLPMAC, which performs floating-point multiply accumulate instructions of the form:
C = C + A * B
where A, B and C are memory mapped registers.
Furthermore, the operation of the coprocessor will be driven by
the access to these registers. Writing into the B register will
trigger the operation and compute a new value in C. Hence,
the operation of the FLPMAC coprocessor is as follows. Initially,
the Nios will clear the C register. Next, the Nios will write
pairs of A and B values, which can be read from a tensor.
(These operations could be done by DMA as well - but our initial
version will focus on Nios-driven operation). Finally, the Nios will
retrieve the C result from the coprocessor, and clear it for the
next multiply-accumulate.
The use of the custom-instruction hardware is chosen to complete the design quickly; not because it yields the smallest implementation. We will simply instantiate two copies of the custom-instruction hardware, and hardwire them to compute a multiply operation and an addition operation respectively.
The following Verilog shows the coprocessor design, flpmac.v.
module flpmac (
  // avalon slave interface
  input  wire clk,
  input  wire reset,
  input  wire [1:0]  slaveaddress,
  input  wire        slaveread,
  output wire [31:0] slavereaddata,
  input  wire        slavewrite,
  input  wire [31:0] slavewritedata,
  output wire        slavereaddatavalid,
  output wire        slavewaitrequest
);

  // floating point multiplier
  wire fpmulclk;
  wire fpmulclk_en;
  wire [31:0] fpmuldataa;
  wire [31:0] fpmuldatab;
  wire [ 7:0] fpmuln;
  wire fpmulreset;
  wire fpmulstart;
  wire fpmuldone;
  wire [31:0] fpmulresult;

  // floating point adder
  wire fpaddclk;
  wire fpaddclk_en;
  wire [31:0] fpadddataa;
  wire [31:0] fpadddatab;
  wire [ 7:0] fpaddn;
  wire fpaddreset;
  wire fpaddstart;
  wire fpadddone;
  wire [31:0] fpaddresult;

//   A = first operand
//   B = second operand
//   C = MAC
//
//   Upon writing B, this unit computes
//
//        C = C + A * B
//
//   A, B, C are read/write from software

  reg   [31:0] Areg, Breg, Creg;
  wire  [31:0] Cregnext;
  reg          Bwritten;
  reg          mulclken;
  reg          addclken;

  always @(posedge clk)
    begin
    Areg <= reset ? 32'h0 :
            (slavewrite & (slaveaddress == 2'h0)) ? slavewritedata : Areg;
    Breg <= reset ? 32'h0 :
            (slavewrite & (slaveaddress == 2'h1)) ? slavewritedata : Breg;
    Creg <= reset ? 32'h0 :
            (slavewrite & (slaveaddress == 2'h2)) ? slavewritedata : Cregnext;
    Bwritten <= reset ? 1'b0 :
                (slavewrite & (slaveaddress == 2'h1));
    mulclken <= reset ? 1'b0 :
                (slavewrite & (slaveaddress == 2'h1)) ? 1'b1 :
                fpmuldone ? 1'b0 :
                mulclken;
    addclken <= reset ? 1'b0 :
                fpmuldone ? 1'b1 :
                fpadddone ? 1'b0 :
                addclken;
    end

  assign fpmulclk    = clk;
  assign fpmulclk_en = mulclken;
  assign fpmuldataa  = Areg;
  assign fpmuldatab  = Breg;
  assign fpmuln      = 8'd252;   // code for multiply
  assign fpmulreset  = reset;
  assign fpmulstart  = Bwritten;

  assign fpaddclk    = clk;
  assign fpaddclk_en = addclken;
  assign fpadddataa  = fpmulresult;
  assign fpadddatab  = Creg;
  assign fpaddn      = 8'd253;   // code for add
  assign fpaddreset  = reset;
  assign fpaddstart  = fpmuldone;

  assign Cregnext    = fpadddone ? fpaddresult : Creg;

  assign slavewaitrequest = 1'h0;
  assign slavereaddatavalid = (slaveread & (slaveaddress == 2'h0)) ||
                              (slaveread & (slaveaddress == 2'h1)) ||
                              (slaveread & (slaveaddress == 2'h2));
  assign slavereaddata      = (slaveread & (slaveaddress == 2'h0)) ? Areg :
                              (slaveread & (slaveaddress == 2'h1)) ? Breg :
                              (slaveread & (slaveaddress == 2'h2)) ? Creg :
                              32'h0;

  fpoint_wrapper fpmul(.clk(fpmulclk),
                       .clk_en(fpmulclk_en),
                       .dataa(fpmuldataa),
                       .datab(fpmuldatab),
                       .n(fpmuln),
                       .reset(fpmulreset),
                       .start(fpmulstart),
                       .done(fpmuldone),
                       .result(fpmulresult));

  fpoint_wrapper fpadd(.clk(fpaddclk),
                       .clk_en(fpaddclk_en),
                       .dataa(fpadddataa),
                       .datab(fpadddatab),
                       .n(fpaddn),
                       .reset(fpaddreset),
                       .start(fpaddstart),
                       .done(fpadddone),
                       .result(fpaddresult));
endmodule
You can integrate the coprocessor as a slave into the Nios system, and then program it. The following is a small driver program that exercises the coprocessor.
#include "system.h"
#include <stdio.h>
#include <string.h>
#include "sys/alt_dma.h"

void main() {
  volatile float *FPLMAC = (float *) FLPMAC_0_BASE;

  printf("write A\n");
  FPLMAC[0] = 1.0;

  printf("write B\n");
  FPLMAC[1] = 2.0;

  printf("write C\n");
  FPLMAC[2] = 0.0;

  printf("read A %f\n", FPLMAC[0]);
  printf("read B %f\n", FPLMAC[1]);
  printf("read C %f\n", FPLMAC[2]);

  FPLMAC[1] = 2.0;

  printf("read A %f\n", FPLMAC[0]);
  printf("read B %f\n", FPLMAC[1]);
  printf("read C %f\n", FPLMAC[2]);

  FPLMAC[1] = 2.5;

  printf("read A %f\n", FPLMAC[0]);
  printf("read B %f\n", FPLMAC[1]);
  printf("read C %f\n", FPLMAC[2]);

  while (1);

}
The program produces the following output, when run. Using such small test programs is crucial to debug the coprocessor before integrating it in a larger design.
write A
write B
write C
read A 1.000000
read B 2.000000
read C 0.000000
read A 1.000000
read B 2.000000
read C 2.000000
write B 2
read A 1.000000
read B 2.500000
read C 4.500000
Finally, the following illustrates how you can use FLPMAC in matmul. Recall that the original matrix multiplication is like this.
    printf("Matmul: %d (%d x %d) x (%d x %d)\n", totalMatrices, aRows, aCols, aCols, bCols);
    for (int i = 0; i < totalMatrices; i++) {
      // Perform the actual matrix multiplication
      for (int aRow = 0; aRow < aRows; aRow++) {
        for (int bCol = 0; bCol < bCols; bCol++) {
          for (int aCol = 0; aCol < aCols; aCol++) {
            // C[aRow][bCol] += A[aRow][aCol] * B[aCol][bCol]
           *(cPtr + (aRow * bCols) + bCol) +=
                    *(aPtr + (aRow * aCols) + aCol)
                  * *(bPtr + (aCol * bCols) + bCol);
          }
        }
      }
      // Move pointers to next matrices
      aPtr += a_matrix_size; bPtr += b_matrix_size; cPtr += c_matrix_size;
    }
This can be optimized in several ways (by studying the reference!!). One
of these aspects is the following. There are only three different kinds of calls
to matmul. That helps you to conclude that the outer loop, i, and the middle loop,
bCol is not used (because its max iteration count is 1).
Matmul: 1 (16 x 784) x (784 x 1)
Matmul: 1 (16 x 16) x (16 x 1)
Matmul: 1 (10 x 16) x (16 x 1)
A simplified version of the matmul loop, which computes the same exact result, is the following. Note that we also simplied the address calculation arithmetic.
    printf("Matmul: %d (%d x %d) x (%d x %d)\n",
            totalMatrices, aRows, aCols, aCols, bCols);

    // Perform the actual matrix multiplication
    float *aAdr = aPtr;
    for (int aRow = 0; aRow < aRows; aRow++) {
      float *bAdr = bPtr;
      for (int aCol = 0; aCol < aCols; aCol = aCol + 1) {
          mul1 = aAdr[0] * bAdr[0];
          cPtr[aRow] += mul1;
          aAdr += 1;
          bAdr += 1;
      }
    }
This routine is now ready to be implemented on FLPMAC. Simply replace the expressions with operations to the memory-mapped registers from FLPMAC.
    printf("Matmul: %d (%d x %d) x (%d x %d)\n", totalMatrices, aRows, aCols, aCols, bCols);

    // Perform the actual matrix multiplication
    float *aAdr = aPtr;
    for (int aRow = 0; aRow < aRows; aRow++) {
      float *bAdr = bPtr;

      // copy cPtr[aRow] to accumulator
      FLPMAC[2] = cPtr[aRow];

      for (int aCol = 0; aCol < aCols; aCol = aCol + 1) {

         // copy aAdr[0] to FPMAC A
         FLPMAC[0] = aAdr[0];

         // copy bAdr[0] to FPMAC B
         FLPMAC[1] = bAdr[0];

         aAdr += 1;
         bAdr += 1;
      }

      // extract cPtr[aRow] from accumulator
      cPtr[aRow] = FLPMAC[2];
This final implementation takes 1.8B cycles for the 100 images to be processed (a speedup of about 4). Further improvements are likely possible by taking the nios out of the computation loop, and replacing the memory access by the nios by DMA.